Backcombing Dreadlocks
Now for the actual backcombing. Can you believe it? It's finally time!
Watch this video first, then check out the detailed info and tips below. You'll find an awesome backcombing demonstration on the DreadHead "How to Dread" DVD.
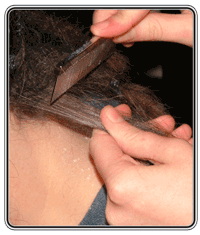
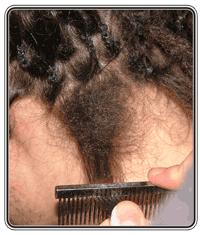
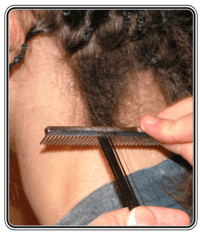
 Backcombing is kinda like teasing the hair and kinda not. Teasing creates a big fluff ball, we want a rope of tightly packed knots. The motion is similar though. If you took the comb and stuck it in the strands you're holding and slid it up towards your scalp, not letting any hairs slip loose and get pushed forward, not much would happen. I suppose if you did it real fast your hair would get warm but that's about it. The trick is to very slowly let a hair or two slip on each stroke forward. These loose hairs will get pushed toward your scalp and start to form a dread. Pack the hair in tight by pressing the comb firmly against the newly forming dread on each stroke.
 You should turn and roll the dread as you go to make sure it comes out round. Backcombing all on one side makes very 2 dimensional dreads. No fun to conversate with at all. In less sensitive areas of the scalp you'll be able to get the knots pretty tight very close to the scalp. In other areas this will be a little painful. - So What? Are ya gunna squirt some? Are ya? Sniffle sniffle. Do you wanna wear the daddy pants or not? - Take it like a knatty soldier you're gunna have phatty dreadlocks-a-plenty! If the backcombing really hurts it means that you're getting tugged on. A little bit of this is going to happen no matter what, especially right by the scalp, but much of it can be prevented by keeping some slack in the dread while it's being backcombed.
When you get comfortable with the backcombing and you're figured out how to pack the hair down and get it nice and tight it's time to take things to the next level. It's friction that causes the hair to get pushed forward by the comb. By increasing the friction in a controlled way you can cause more hair to get pushed forward and you can speed up your backcombing progress. Lock Peppa allows you to do just that.
 The reason you don't start out with Lock Peppa from the beginning is that you have to develop a feel for backcombing before you add the "Peppa variable" into the mix. Adding too much Peppa causes, you guessed it, too much hair to move forward. This leads to unpredictable, crappy-ish results. Once you know what it's like to backcomb dreads nice and tight without Lock Peppa it will be easy to fine tune your Peppa amount to get the best results.
The best way to apply the Peppa, contrary to most peoples first inclination, is not by shaking it directly on the hair. (I know, I know...Why did I name it Peppa and put it in a bottle with a shake-shake top if I didn't want people to shake it like a peppa shaker? I don't know...Who's John Galt?) Shake some peppa out onto a counter or table top. A mirror will work too but you'll get funny looks. When you begin backcombing a section dip your finger tips in the Peppa and pull a small amount though the section with your finger tips. It takes very little to get the desired flava...err...result.
 When the hair grows you want it to get tangled into the dread. Keeping the knots that are closest to the scalp tight will help new growth dread as it grows. This can be tricky and painful with a comb. (Don't worry, no one sees that tear forming in the corner of your eye...you big baby =) Continue to back comb the hair slowly working your way to the end. Don't rush. The most common reason dreads need to be re-started or fixed is that the initial backcombing was rushed and the knots didn't get packed tightly together. You will get done faster if you don't pack the knots tight but you will end up re-backcombing them before the first week is over. At some point I'll warn you properly about re-backcombing dreads...but for now I'll just go all kindergarten on you and say that "Rebackcombing after the first week it's a BIG DREADY NO NO!" Don't do it. The time to get the backcombing just right is during the first week. Then you want to leave it alone and help it lock with palm rolling .
You know you're done backcombing when you get to the end of the dread and have nothing to hold onto. Then it's time for a well placed rubber band at to keep everything in place. The same people that scream about how wax is evil will scream about how bad rubber bands are for dreads. Well, if you 're listening to them I can't help you. For some detailed info how to use bands properly check out our FAQ. You can do a search for "Rubberbands" and you'll see 3 articles. Those will give you a great understanding of how to use rubberbands to speed your dreading, reduce your maintenance and avoid a bunch of work.

OK, now a rubber band to finish it off. Tighten the tip up as much as you can with the comb before you put on the band. You'll notice it's kinda hard to get a good grip on the lil guy cause you have only a small bit of hair to grab and pull against. Grab the very end in your fingers, fold the undreaded hair you have left back on itself, and fire an elastic on to hold it. If you have regular rubberbands and pro-elastics you'll want to use the pro-elastics for your tips. Make sure the elastic is really tight at the tip. For more info on the differences between bands on the tips and on the roots check out this page. The elastic will keep the tip of the dread together while the body of the dread locks up. When the body of the dread near the tip has matured a bit it will be tight enough that you'll be able to pull the loose hair -- sometimes called "paintbrush tips" -- in to the tip of the dread with a loose hair tool. The tip will then lock nice and tight. This is the quickest easiest way to round, blunt, super pro-lookin' tips that are trouble free. It's hard to say how long you'll need to wait to do the "pulling in" of the tips. Usually sometime during the second month, a bit longer for thinner dreads. When you're ready to blunt your tips check out this video: How to blunt the tips of your dreadlocks.
So there you go, your very first rope-like collection of knotted hair - oh you thought it was a dread? lol not yet, but it's on it's way! Now that you've backcombed one dread I want to give you a backcombing checklist that you can use for each dread as you go. This backcombing checklist was originally part of the first Lock-Up-Date and it was delivered as soon as all the backcombing was done. Well I started thinking about it and I decided that it would benefit you guys more if it were available now before you finish your backcombing. That way there's a better chance that all the backcombing will be done right - or that less of it will have to be re-done. So Click Here for the Backcombing Checklist that's part of the first Lock-Up-Date.
One common problem often occurs when you're trying to backcomb lager dreads in coarse hair. (Coarse hair means that each strand is large in diameter, it's the opposite of fine hair.) What happens is difficult to describe, but basically the dread feels like the knots on the surface are tight, yet the dread is squishy, almost hollow inside. Almost like the outside of the dread is backcombed but the inside isn't. You can get around this just by taking your time and getting the backcombing tighter as you go. You'll have to re-backcomb any dreads that feel hollow-ish. By making the sections a little smaller you can make dreads in coarse hair easier to backcomb.
Sometimes it's difficult and painful to get good knots started close to the scalp with the comb. It's not essential that you have knots there but if you can make it happen it's definitely to your advantage to do so. Knots tend to migrate to the part of the dread with the least knots kinda like high pressure air moves to areas with less pressure. (FYI Dreadlock Dynamics is the study of how knots move through Dreadlocks. I shouldn't joke, some hippie engineer is going to see this and think he missed his calling) =] Because the hair is clean and has plenty of friction right now you can create knots easily. This is an excellent time to try out some clockwise rubbing. You can use clockwise rubbing to create knots in straight hair at the roots or even in the middle of the dread. Clockwise rubbing is an acquired dread skill. Meaning you probably won't "get it" the first time you try. Please don't worry or think it won't work in your hair or something - in fact I'd count on it not working the first few times. I mention it here not cause you need to do it now but more so, if you happen to wonder how you'll keep your new growth knotting as the dreadlocks grow you'll have an answer - otherwise you might think nobody has thought that far ahead yet. =]
After you begin adding the dread wax it will be much harder to make new knots. The dread wax is not for making knots, it's for helping knots compress and tighten. Read that again while you stroke your chin and ponder it - like it's one of the keys to understanding how dreading works.
When you begin adding the wax you are moving from one dreading phase into another. You are going from the knot making phase into the knot compressing phase. Backcombing is knot making, so is clockwise rubbing and dread balling. Knot making is always done when you have lots of fiction in the hair. This is done by getting the hair clean and free of residue by washing with the Dread Soap and it can be boosted further with Locking Accelerator and Lock Peppa. It should always be dry as well, never wet for making knots.
After the knots are made they must compress and get much much tighter over time. This is where the wax comes it. It allows the hair to move when you palmroll and compress the knots. Then it helps the knots stay compressed when you leave it alone. The hair gets used to being compressed and then it can compress more the next time you palmroll.
The dread wax is not for making knots, it's for helping knots compress and tighten. Read that again while you stroke your chin and ponder it - like it's one of the keys to understanding how dreading works.
When your backcombing is done and your straight hair is knotted you're almost ready to move on to the tightening/compressing phase. Before you do, you should go ahead and kick of your Lock-Up-Dates®. You can do it after waxing if you have to but it's preferable to do it now - right when you finish the backcombing. As it turns out the first Lock-Up-Date® has some helpful tips and an after backcombing checklist that you can use right now - I'm hoping this will be good incentive to get them started right on time so nobody forgets to do it later =]
When you return you'll be all set for adding Dread Wax...

